5.1— Using Nomad to Broadcast Particle Data & Actuate
Publish and subscribe using the Particle Event Stream and a Photon & Actuate
In this portion we'll teach you how to get data from your particle event stream and put the it into a browser through the help of nomad, then actuate a response to an LED on the particles themselves.
Heads Up! This Guide is Gonna get Real Nerdy Real Quick!
This guide assumes you have at least a small bit of knowledge on how to work with particle and wire things up correctly. Particle has a ton of great documentation on their site. We'll be using the Particle Build Web IDE to interface with Particle Photons.
The Setup — Myko Prototype
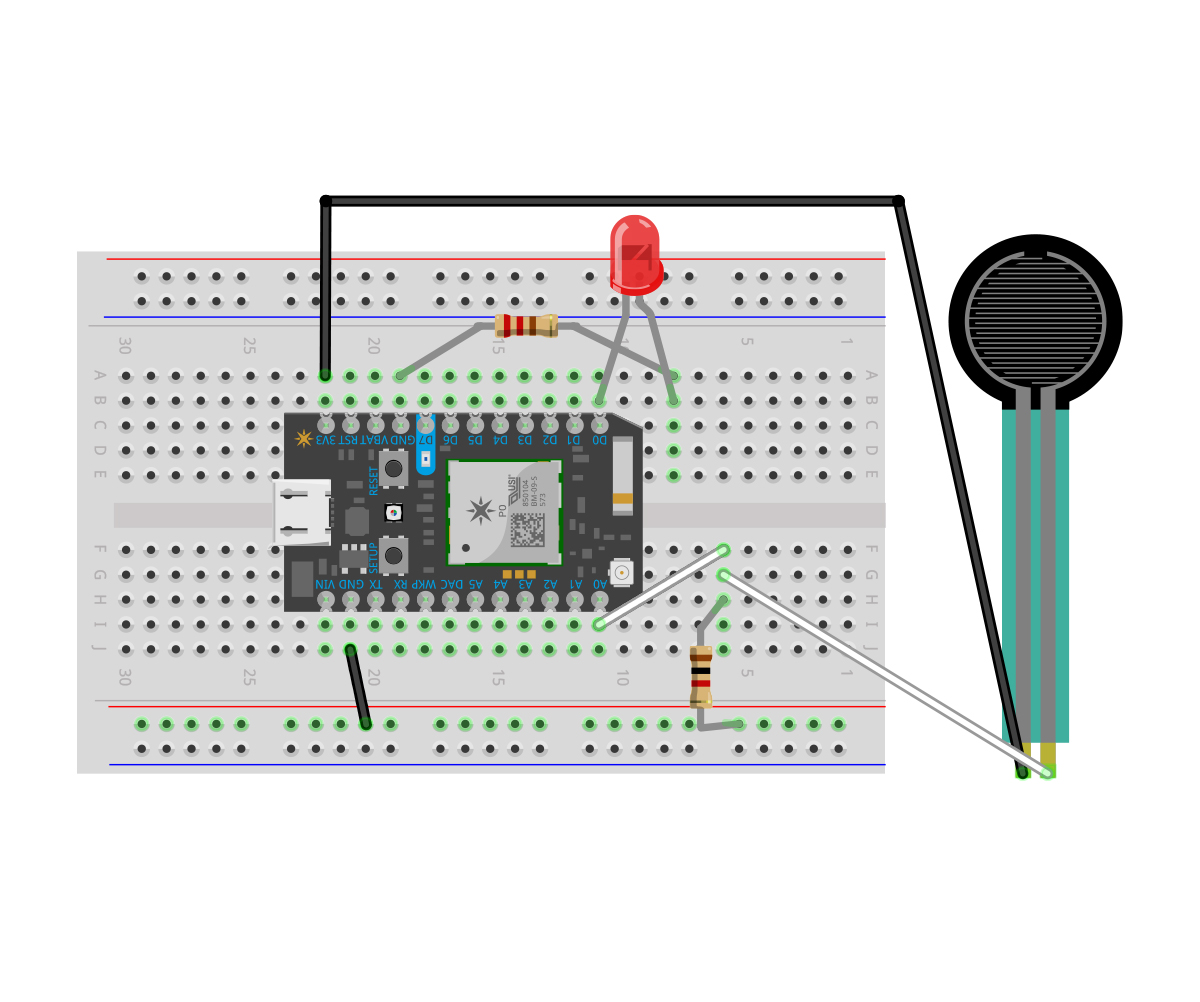
For this tutorial, we're going to set your photon up according to the pin out for Myko, a prototype we recently worked on that reads data from two Nomad nodes with Force-sensitive resistors on them. For this tutorial we'll be doing three things:
- On particle, reading analog data from an FSR and broadcasting the data
- With Nomad, creating two separate nodes that broadcast the data using the particle event stream
- Creating a composite node that subscribes to the streams, does logic on the data, then actuates on the photons
1— Getting your particle running and pinned up
Once you have your particle photon setup on your phone per the documentation directions, we'll disconnect it from power so we can wire it up with out pinout for the prototype.
For this setup, you'll need:
- 1x 1k Ohm Resistor
- 1x 220 Ohm Resistor
- 1 x two-pin LED of your choosing
- 1 x Force-Sensitive Resistor (FSR), Square, or round
A fritzing diagram is posted below, or you can download it here.
After you've pinned everything up, we're going to take a look inside of the /particle/particle-code directory inside of the base repo for our sample myko particle code named particle-detect-cup-drop-v1.4.ino. Copy this code, and paste it into your Particle Build IDE, then click Verify, and if the build succeeds, Flash the code to your particle. If you want to learn about what that code is doing, there are a ton of comments every step of the way inside, you should take a read through.
Ask Yourself:
- Is your photon setup per the directions?
- Did you re-connect the particle back to power?
- Did you flash our example code to your Device?
2— Getting the Publishing Nomad Node Running
The mykonode.js file contains everything you need to create a Nomad node that broadcasts your photon's particle event stream. You will need to know:
- Your Particle Account Credentials (Email, Password)
- Your Particle Device ID, You can get this from your particle phone app by selecting your particle or the Particle Build IDE
- Your Particle API Access Token, You can get this from the settings tab in your Particle Build IDE
We're listing the code here for quick access:
const Nomad = require('nomad-stream')              // Includes the nomad js
const Particle = require('particle-api-js')        // Includes the particle api js
const credentials = require('./particle-login')    // Requires your particle credentials without exposing them

const deviceID = 'YOUR_PARTICLE_DEVICE_ID'         // This is your particle's Device ID, find it in your particle app, or from the Build IDE interface
const events = ['forcereading']                    // These are the names of the events you want to track from the Event Stream

const particle = new Particle()
const node = new Nomad()

let instance = null
let token = null
let stream = null
let publish = null

const privKey = 'YOUR_BIG_LONG_PRIVATE_KEY'

/* This is optional, but if you don't provide a private key,
your Node's subscription ID will be different every time you restart your node.
If you comment this out, remember to take it out of the node.start() function below. */

node.start(privKey)
  .then(() => {
    return particle.login(credentials)            // Sends a request to the particle API to login
  })
  .then(response => {
    token = response.body.access_token            // Gets an access token from the particle API on success
    console.log(`Got token: ${token}`)
    return particle.getEventStream({ deviceId: deviceID, name: events[0], auth: token })   // Gets the particle event stream
  })
  .then(stream => {
    stream.on('event', data => {
      node.publish(JSON.stringify(data))         // Converts the data to a string and streams it whenever new events come through
      console.log(data)
    })
  })
  .catch(err => {
    console.log(err)
  })
Breaking Down the Code
The first part of the code is just requirements for access to the particle api and including nomad in your app.
const Nomad = require('nomad-stream')              // Includes the nomad js
const Particle = require('particle-api-js')        // Includes the particle api js
const credentials = require('./particle-login')    // Requires your particle credentials without exposing them
particle-login.json is comprised of your personal login credentials for your particle account (Or whatever account that has access to the particles themselves.) Since this is node.js code, we can require this on the server side and it doesn't get exposed, which is pretty handy, since we're going to use it to authenticate with the api and get an access token so we can interact with your particles.
A template for particle-login.json would be:
{
  "username": "[email protected]",
  "password": "your_super_secret*password!123",
   "access_token": "YOUR_ACCESS_TOKEN",         // This can be retrieved from the settings region of the Particle Build IDE
  "token_type": "bearer",
  "expires_in": 7776000,
  "refresh_token": "b5b901e8760164e134199bc2c3dd1d228acf2d90"
}
Providing a private key for your node is optional, but if you don't provide one, your nomad node will have a different subscription ID every time it's restarted. You can generate some throwaway private keys here for the demo.
const privKey = 'YOUR_BIG_LONG_PRIVATE_KEY'

/* This is optional, but if you don't provide a private key,
your Node's subscription ID will be different every time you restart your node.
If you comment this out, remember to take it out of the node.start() function below. */

node.start(privKey)
In the myko code we've put onto your particle, we publish an event with the name forcereading, this event is published when the FSR is affected enough to trigger one of our if else statements. So here in the events[] array, we've replaced your_event with forcereading. Note, if you rename the event to something else, or want to return multiple events, the names in this array MUST match the name in your particle event stream, or else the api won't know what event to grab data for.
const deviceID = 'YOUR_PARTICLE_DEVICE_ID'         // This is your particle's Device ID, find it in your particle app, or from the Build IDE interface
const events = ['forcereading']                    // These are the names of the events you want to track from the Event Stream
The following series of promises makes a request to the particle API to obtain an authorization token which it uses to read the particle event stream for your specific device. It then inserts the JSON output into a variable, data and then converts it to a string and streams it every time a new particle event occurs.
.then(() => {
return particle.login(credentials) // Sends a request to the particle API to login
})
.then(response => {
token = response.body.access_token // Gets an access token from the particle API on success
console.log(`Got token: ${token}`)
return particle.getEventStream({ deviceId: deviceID, name: events[0], auth: token }) // Gets the particle event stream
})
.then(stream => {
stream.on('event', data => {
node.publish(JSON.stringify(data)) // Converts the data to a string and streams it whenever new events come through
console.log(data)
})
})
.catch(err => {
console.log(err)
})
Now that you understand what's going on, let's start IPFS:
ipfs daemon
Then in a new terminal window, run the code we just wrote:
node mykonode.js
The publisher will generate an id, print it, and start publishing messages from the Particle event stream whenever they occur. In this example your event should fire every time you place something onto the FSR or press it. You should see messages printed every time this happens.
The publisher stores its identity in files in the directory/store. If you stop the publisher and run it again, you'll need to delete/storefirst.
When you started your node, you should see its subscription id printed at the beginning of the stream, copy this to your clipboard, you'll need it for the next step!
It'll look something like: QmXLZvD9yaD7A5AhwWWggN7dhsAznLGxXGXKWvREgArAFT
3— Subscribing to the data in browser
Once you've copied your node's publisher id from the previous step, open myko/mykosubscribe.js and insert it into the subscriptionId const. This will subscribe this node to the publisher you made before. Afterwards, right-click myko/mykosubscribe.html and open it in google chrome. You should see your particle event stream printing into the view as events occur.
// ID of the node to subscribing to
const subscriptionId1 = 'your-first-subscription-id'
const subscriptionId2 = 'your-second-subscription-id'
Breaking Down the Code
In this example, we're doing a fair amount with the data, something to note is that anything outside of node.subscribe() will not be repeated every time a new event occurs, but since node.subscribe() is always listening for data, everything within it is repeated when a new event comes in.
let readings_cafe = []; // instantiating these outside the event loop so they don't get overwritten every time we recieve particle events
let readings_ideo = [];


/*

ANYTHING OUT HERE DOESN'T GET REPEATED ON A NEW EVENT
I've put two arrays outside of the node subscribe promises, this is because data within the
node subscribe call gets reiterated every time a new event comes in. This way, I can push data
into them without them getting overwritten, and can reference them in other logic.

*/

node.subscribe([ subscriptionId1, subscriptionId2 ], (data) => {

/* EVERYTHING IN HERE GETS REPEATED ON A NEW EVENT */

// setting up objdata as a JSON object

const objdata = JSON.parse(data.message)

// splitting our particle data to separate the text from the reading

const type = objdata.data.split(', MSG:')
Now that we're inside the event loop and we've split our message into parts that we can define, we attach strings to the different event types, and then put the reading number into its own variable. Important to note is that here we're doing this for both nodes. So here, objdata.num refers to the force reading from node 1 or node 2 at the moment.
/*

a series of if else statements to attach strings to different event
types that we might receive from the particle

*/

if (type[1] == "CUP_ON") {
objdata.name = "Cup put on."
}

else if (type[1] == "CUP_OFF") {
objdata.name = "Cup taken off."
}

else if (type[1] == "POUR_EV") {
objdata.name = "Pour Occured."
}

else if (type[1] == "THRESHOLD") {
objdata.name = "Something changed."
}

else if (type[1] == "FRESH_POT") {
objdata.name = "Fresh Pot Placed on."
}

else if (type[1] == "POT_OFF") {
objdata.name = "Pot Taken off."
}

// put the reading itself into a variable

objdata.num = type[0];
Here we separate data into one node or the other node. since objdata is scoped to the subscription, we can use their subscriptionId's to differentiate them but still just objdata to access the values themselves.
if (data.id == subscriptionId1) {
// DEBUG REGION outputting the force reading for IDEO and the event name

document.getElementById('reading').innerHTML = objdata.data + " " + objdata.name;

// outputting the force reading for IDEO

document.getElementById('ideo-force').innerHTML = objdata.num;

// outputting the event name for IDEO

document.getElementById('ideo-reading').innerHTML = objdata.name;

/* pushing readings into the array for IDEO, wanted to do logic on these arrays
and pop them when a new pot event is registered */

readings_ideo.push(objdata.num)

// creates a value for the current reading to send into the compare levels function

currentReading1stat = objdata.num;

// creates a value for the particle ID to send into the compare levels function

deviceID1 = objdata.coreid;

/* outputs the contents of the past readings to the page for seeing how the
readings act visually */

document.getElementById('ideo-past').innerHTML = readings_ideo.join(', ');
}

else if (data.id == subscriptionId2) {
// DEBUG REGION outputting the force reading for 1369 and the event name

document.getElementById('reading2').innerHTML = objdata.data + " " + objdata.name;

// outputting the force reading for 1369

document.getElementById('cafe-force').innerHTML = objdata.num;

/* pushing readings into the array for IDEO, wanted to do logic on these arrays
and pop them when a new pot event is registered */

// outputting the event name for 1369

document.getElementById('cafe-reading').innerHTML = objdata.name;
/* pushing readings into the array for 1369, wanted to do logic on these arrays
and pop them when a new pot event is registered */

readings_cafe.push(objdata.num)

// creates a value for the current reading to send into the compare levels function

currentReading2stat = objdata.num;

// creates a value for the particle ID to send into the compare levels function

deviceID2 = objdata.coreid;

/* outputs the contents of the past readings to the page for seeing how the
readings act visually */

document.getElementById('cafe-past').innerHTML = readings_cafe.join(', ');
}


/* This next line outputs the reading from both nodes into the DEBUG region of the app and the console */

document.getElementById('reading3').innerHTML = JSON.stringify(data);
console.log(data)

/* This line sends data into our compareLevels function*/

compareLevels(subscriptionId1,subscriptionId2,currentReading1stat,currentReading2stat,deviceID1,deviceID2)

})
Compare levels consumes the current readings and compares them, if one is heavier than the other, then POST requests are sent to the particle api to turn off both devices LEDs, then turn on the LED of lighter load. The request requires a particle auth token. For purposes of this demo, we just used a security token obtained from when we started our nomad node. However, exposing your security token like this client side is bad practice, and you should probably just setup a node.js server to acquire a token on the server side that you can destroy as well.
function compareLevels(subscriptionId1,subscriptionId2,currentReading1stat,currentReading2stat,deviceID1,deviceID2) {

const particleToken = 'insert-particle-auth-token-from-running-node'; // This is a token that you can get from one of your running nodes

/* here we're comparing the two values, and on a result, sending a series
of post requests to the particle api to interact with our particles. */

if (currentReading1stat > currentReading2stat) {
document.getElementById('verdict').innerHTML = "IDEO Has more coffee";

$.post( "https://api.particle.io/v1/devices/" + deviceID1 + "/led/?access_token=" + particleToken, {'arg':'off'}, function() {
console.log( "success" );
})
.done(function() {
console.log( "success, lit led on IDEO plinth" );
})
.fail(function() {
console.log( "error in IDEO plinth" );
}) // turnofIDEO

$.post( "https://api.particle.io/v1/devices/" + deviceID2 + "/led/?access_token=" + particleToken, {'arg':'off'}, function() {
console.log( "success" );
})
.done(function() {
console.log( "success, turned off led on 1369 plinth" );
})
.fail(function() {
console.log( "error" );
}) // turnoff1369

$.post( "https://api.particle.io/v1/devices/" + deviceID1 + "/led/?access_token=" + particleToken, {'arg':'on'}, function() {
console.log( "success" );
})
.done(function() {
console.log( "success, lit led on IDEO plinth" );
})
.fail(function() {
console.log( "error in IDEO plinth" );
}) // turnonIDEO
}

else if (currentReading1stat < currentReading2stat) {
document.getElementById('verdict').innerHTML = "1369 Has more coffee";
$.post( "https://api.particle.io/v1/devices/" + deviceID1 + "/led/?access_token=" + particleToken, {'arg':'off'}, function() {
console.log( "success" );
})
.done(function() {
console.log( "success, lit led on IDEO plinth" );
})
.fail(function() {
console.log( "error in IDEO plinth" );
}) // turnoffIDEO

$.post( "https://api.particle.io/v1/devices/" + deviceID2 + "/led/?access_token=" + particleToken, {'arg':'off'}, function() {
console.log( "success" );
})
.done(function() {
console.log( "success, turned off led on 1369 plinth" );
})
.fail(function() {
console.log( "error" );
}) // turnoff1369

$.post( "https://api.particle.io/v1/devices/" + deviceID2 + "/led/?access_token=" + particleToken, {'arg':'on'}, function() {
console.log( "success" );
})
.done(function() {
console.log( "success, lit led on IDEO plinth" );
})
.fail(function() {
console.log( "error in IDEO plinth" );
}) // turnon1369
}

else {
return -1;
}
}

})
})()